
My Favourite Ways to Display and Store Children's Artwork
Have you run out of wall space yet?!
In last week’s post, I shared some advice about how you can sort through your children’s artwork to help you decide what stays and what you say goodbye to. This week, I’m going to share some of my favourite ways to display artwork temporarily before storing it long-term. ‘How can I store my children’s artwork?’ is a question I’m asked a lot. Some of my clients find themselves drowning in it and have run out of wall space to display it all. That said, I’ve also come across some amazing ideas already being used in the homes of my clients, which I will share with you all…
TIP: As soon as a piece of artwork comes in, write the date on the back (and the year group your child is currently in). Trust me, it’s a nightmare trying to figure out when they created it if you’re going through thousands of pieces years later!
FYI: The items that are shared in this post are not sponsored; I am simply sharing good ideas that I’ve come across. You know I would never try to sell you something you don’t need! Buying items with intention (and inspiring others to do the same) is something I am very passionate about and continuously committed too.

Hanging display wire

Art gallery wall using matching frames

A great way to repurpose hangers (that visually spark joy of course!)

12 clipboards create an ever-changing gallery
Displaying Artwork (Short Term Storage)
Hanging Display Wire: I often find display wires in my client’s home and it’s a quick and easy way to showcase your children’s artwork. If you are going to use this, I always recommend regularly checking in with the contents. A good rule of thumb is to complete a ‘check in’ when you can no longer see gaps between the artwork!
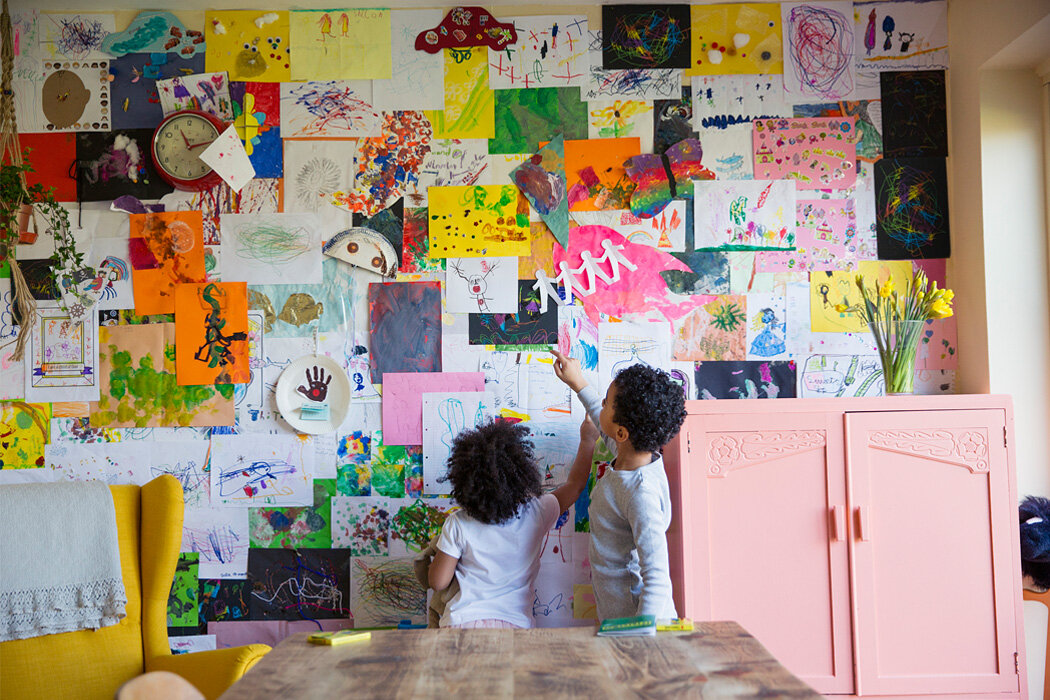
Art Gallery Wall: Assign one wall in your home to showcase your children’s artwork. This can be done using simple blu tac, frames, hangers or clipboards. Depending on how often you want to view the work, choose your space wisely! I once worked with a client who used an entire wall in her kitchen to showcase her children’s artwork and it soon grew out of control. That’s another thing to be aware of; choose a target number of pieces to showcase at one time otherwise the space can become cluttered very quickly.
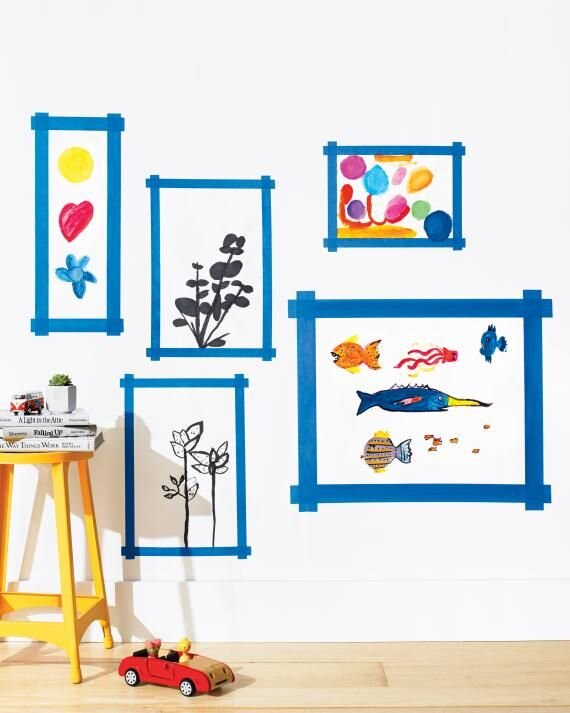
Washi Tape Frames: This is my favourite idea to display artwork. Not only is washi tape sustainable (washi tape is made out of renewable resources and is biodegradable), you can choose different colours and styles to creatively match the interiors in your home. I’m planning on create a washi frame wall when the children are older and can create more than just a scribble on a piece of paper!
Display frames that open: The hinged storage frame may not be the cheapest option, but it is certainly easy to use and aesthetically pleasing. The frame makes it really simple to feature your children’s artwork and store other pieces behind them. You can simply hang the frame on the wall and open it every time you want to showcase a different masterpiece to reflect the season or what your children are currently working on.
DIY magnetic frames for the fridge: If you’re feeling crafty, and prefer storing artwork on the fridge (many of my clients do this as it puts a good cap on the amount that’s on display at one time), you can create your own magnetic frames. For a step by step guide on how to do this, visit Easy DIY Fridge Makeover on the How Does She? blog.

Display frames with wire & pegs

DIY magnetic fridge frames
Washi Tape frames - my favourite!

Display frames that open
Storing Artwork if you DON’T have much time at the moment to come up with a long term solution to store your pieces in a meaningful way…
Accordion Folders: To prevent pieces of art from scattering all over your home, true to KonMari philosophy, we need to find a home for this category. An accordion folder (make sure it’s A3 in size) is a great temporary home for artwork until you have the time to decide how to store it long term. Depending on the age of your child (along with their interest and/or progress in using the KonMari Method), they can store their accordion artwork folder in their room and complete joy checks on the contents once every couple of months, or once a year. The time frame itself isn’t set in stone; you have to find the check-in point that works for your family.
A large container: A weather tight box is also a great way to store artwork temporarily. If you have more than one child, assign a box for each child to keep the work separate. This can be stored somewhere out of sight (but not too out of sight that you forget it actually exists!). Putting the lid on is important as this creates a limit on how much you’re keeping for now, and acts as a good reminder to invest your time and energy into doing something meaningful with it when it starts to become crowded and full.

An accordion folder

Storing art in a weather tight box
Storing Artwork if you have PLENTY of time (Long Term Storage)
In this section, I have included some digital and physical options for long term storage. I believe there are some great digital services out there that allow you to turn your child’s artwork into something beautiful. That said, you don’t want to fall into the trap of uploading everything. You have to choose the number of art showcase books you feel is right for you (and your storage space). Furthermore, if you have invested in a digital option, a choice needs to be made about whether or not you keep the physical artwork itself. I believe that if you have already invested in a digital option, there isn’t really much need to hold on to the physical item.

Send your child’s artwork to Artkive
A box with drop down files
Keepy: (Digital option) This is a free app with the option of signing up to an annual fee for unlimited uploads. You can upload photographs of your child’s artwork to the app, which are organised by child/year. Your child can record themselves on the app to explain what they’ve drawn, which can then be shared with family members, who can comment back their approval. Keepy also allows you to create a photobook or canvas with the images. To find out more, watch their promotional video.
Artkive: (Digital option) Artkive is a service that turns your child’s artwork into a book or framed mosaic. You can send off for an Artkive box and once it’s with you, fill it with your child’s art and send it back to them. They professionally photograph the pieces you’ve sent and create the book or mosaic. This is a great option if you don’t have the time to photograph and upload the artwork yourself, as well as messing around with the formatting. Artkive is based in the US. The UK version is Doodle Nest.
Photo album of artwork: (Digital option) If you don’t mind photographing your child’s artwork, uploading it and playing around with formatting, you can create an artwork photo book using Shutterfly, Snapfish, Mixbook (based in the US) or Papier (for a more high end finish).
Art Portfolio (or scrapbook): An art portfolio can be large and bulky, but it’s a good option if you have the time and enjoy scrapbooking or creating your own memory keepsakes. Some of my previous clients have used the goal of an art portfolio to encourage them to be ruthless in their initial sort through. If each item you keep takes you around 5 minutes to trim, stick and write a meaningful caption for it in a scrapbook/memory book, you can calculate the potential time a project of this nature will take. This may deter you from keeping 500 pieces!
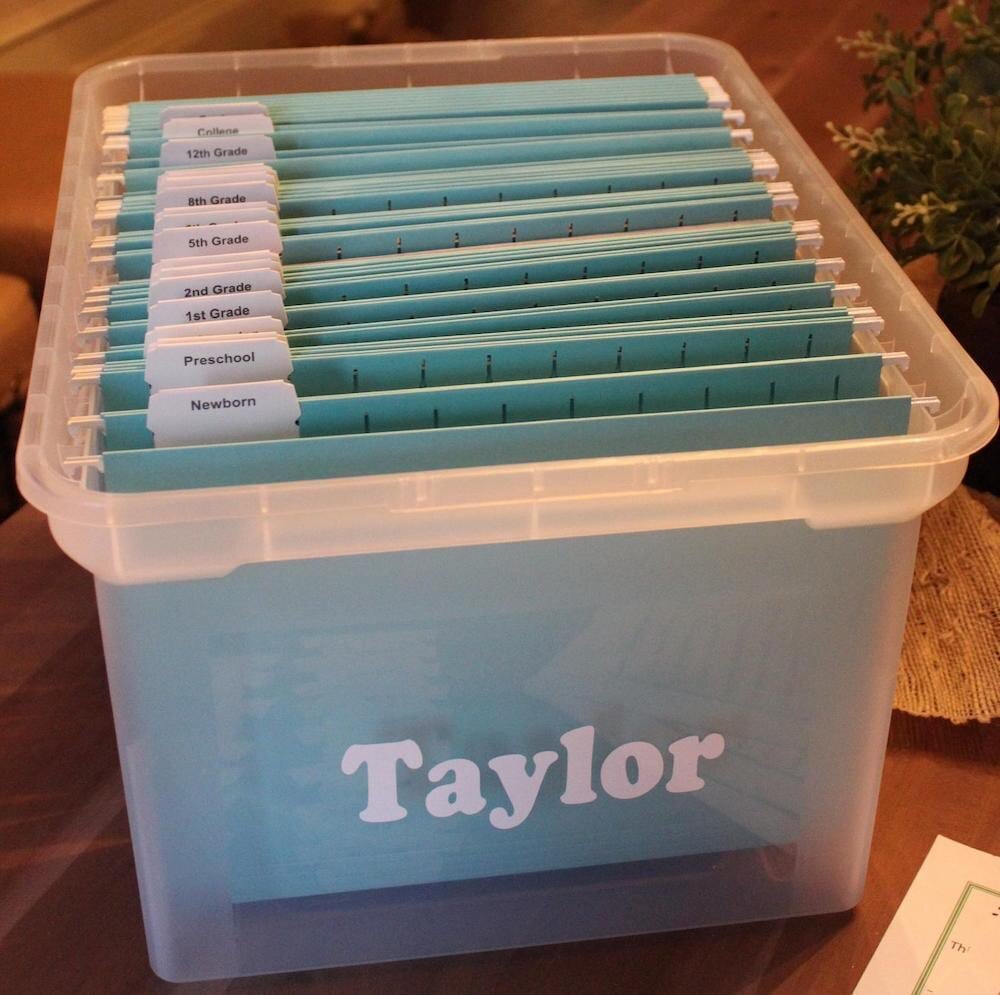
Box with drop down files: I’ve seen this idea used for storing school work long term. This is my goal for storing Romeo and Hermione’s school work as they progress through the years, but the verdict is still out on whether I will store artwork in this way too. I prefer to have artwork on display or stored in a book separate from school papers; storing artwork in drop down files makes it hard to access the pieces in my opinion, and when they are accessed, there may be a tendency (on behalf of mini people hands!) to get everything out, leading to everything becoming muddled up. One advantage to a box with drop down files is that it’s easy to put together and keep up with the maintenance once you’ve started it.
File folders: It’s fairly easy to assembly artwork into file folders and they allow for easy viewing. File folders take up a lot of space so I would recommend setting a limit on how many you’re going to use to store the artwork you wish to keep. You also want to consider how many A3 / 3D pieces are coming into your home as file folders won’t serve you here (unless you photograph the items and document them that way).
Frame it!: I am an only child and although I feel I was a mediocre young artist at best, there are a number of my pieces of artwork that have been framed and attached to the wall of my childhood home. They’ve been there for years and there are no signs of them disappearing anytime soon. If a piece of art really sparks joy for you, and the memory associated with it creates a feeling of warmth and love, I always recommend putting that piece in a frame where it can be enjoyed every day. I’m aware that only a select few can pass this test. I currently have one piece that deserves a frame and that’s a piece that Romeo and Hermione created together ahead of their first shared Christmas. It’s a reindeer and festive bells that have been created in paint using Hermione’s footprint and Romeo’s handprint. I can see this on our wall for many years to come so it deserves a permanent visual home.

Romeo and Hermione’s Christmas Collaboration - this one sparks joy!
I hope you’ve found the above information useful. I’d love to know some of your favourite ways to display your child’s artwork; leave your comments below, especially if you’ve come across any other original ideas!